
Mapping
Using Google Earth
Open GoogleEarth
Try several maneuvers in GoogleEarth
- Click on the earth approximately where Oregon is located
- Use the controls in the upper corner of the earth
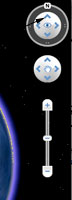
- to zoom in and out of a location (slide bar on right)
- to move from east to west and north to south (arrows and polygon in the middle)
- to locate your community and follow a road to a neighboring community
- to change the landscape from "looking straight down" view to a view as if you're flying a plane (top arrow in top "compass")
- Select "Fly to" in left column and type in the
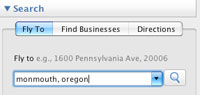 address of your home address
 - Placemark your home address (with the push pin icon)
- Find the latitude and longitude of your home (bottom of the screen: select View, then Status Bar if you don't see it)
- Select the measuring tool and measure the distance between two locations
- Find a favorite vacation spot
- Draw a line from the 2008 Olympics to Monmouth to measure the shortest distance (what other state would you find over?)
Make a tour
- Create a folder
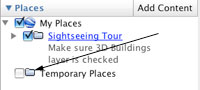
(In My Places column, click on the folder 'Temporary Places', click 'Add' in the menu bar and select Folder, name the folder for your tour) - Create placemarks to be included in the tour (see push pin icon on the top of the main screen). Note: Review process at http://earth.google.com/userguide/v4/ug_placemarks.html#new
- Click on the push pin
- Move the new push pin to your desired location
- Give it a name in the screen that popped up
- Click Done or OK
- Highlight placemark in Places folder

- Go to Get Info under Edit in the menu
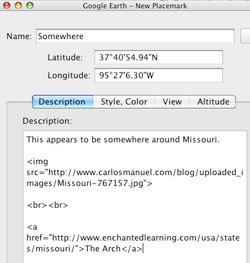
- Add a paragraph of description
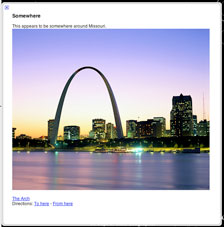
This will appear in the balloon the comes up over the push pin when you click on the push pin. - Add an image to the balloon
- Find an image on the Internet so that the address in the URL has the extension .jpg, .gif or .png, and a size about 400px wide.
- Copy that address
- Back in GoogleEarth, highlight placemark in Places folder, go to Get Info under Edit in the menu.
- Beneath your description, type <img src=",
then paste the address of the webpage containing the desired image,
then type ">. It will look something like this
<img src="http://www.wou.edu/~saxowsd/ images/bear.jpg"> - Add a link to a webpage
- Find the webpage on the Internet. Copy the URL address.
- Back in GoogleEarth, highlight placemark in Places folder, go to Get Info under Edit in the menu.
- Type <a href="
then paste the URL address,
then type ">,
then type a word or phrase which will serve as the link in the balloon,
then type </a>
It will look something like this
<a href="http://www.wou.edu/~saxowsd/ed421/index.html">ED421 Webpage</a> - Click OK or Done –
Click on the push pin to open the balloon. Click on push pin to left of placemark name to change push pin appearance
---- Repeat these steps to create more placemarks. ----
- Check that the placemarks are in your new folder (if you click the minus in a square to the left of your folder they should shrink up into the folder). If they aren't, simply drag and drop them into the folder.
- Turn all the placemarks you have created on by clicking the tick box to their left
- In the top Menu click on Preferences and then Touring. Set the time Between Features (about 3 to 5) and At Features (about 10 to 15). Also select "Show Balloons..." and finally OK.
- Click your folder so it has a blue background then click the 'Record a tour' button in the main button bar above the main screen. It's a video cam icon.
- Let the automatic tour record. Or move to a position where you can see an interesting view associated with your first placemark you created to be in the tour.
- Turn the placemark on. You may want to click it in the places column to view the pop up balloon too. You may want to turn it off again before moving to the next step but you can choose what you do and the tour will still work. Repeat the above steps for all the placemarks in your tour.
- Click the record button again to stop the tour. It should play what you've just recorded. If you're happy with it, click the disk icon in the tour control box bottom left.
- The tour should appear in your new folder. Click on your folder, then Save Place as, then save the folder as a file to somewhere sensible like on your Desktop. The drag the file into your public_html.

In short:
- Create a folder in Temporary Places
- Select a location, click on the push pin
- Type a name and description, add an image and link
- Repeat selection of location and adding information several times
- Check that placemarks are in folder and select folder
- Set preferences
- Click on record and then "save" icon
- Highlight folder
- Save Place as (right click) on desktop
- Drag to public_html folder
- To retrieve, in browser find file; right click and save link to Desktop
- In GoogleEarth, open file from desktop
Mapping Assignment
Using GoogleEarth create a tour of at least five locations. 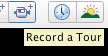
Create a balloon at each location with a description, an image and link to the Internet on each.
The theme of your tour is to be educational, such as touring natural features, cities of distinction, monuments of historic value, origins of different languages, homes of special animals.
The tour is to be saved as a .kmz document in your ![]() public_html folder. There will be links established so that you may view each other's tours.
public_html folder. There will be links established so that you may view each other's tours.
Some useful and entertaining links
A useful GoogleEarth guide http://earth.google.com/userguide/v4/ug_drawing.html
Thanks to http://googleearthdesign.blogspot.com/search/label/How To
For fun: http://www.youtube.com/watch?v=2lXh2n0aPyw